
This tutorial will explain to you, step-by-step, how to cover and embellish alligator hair clips using ribbon, felt flowers and brads to create custom hair bows.


Supplies:
 1. First, gather your supplies and plug in hot glue gun to allow time to heat up
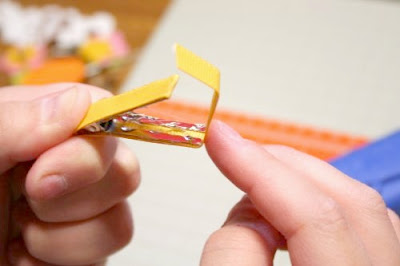
 2. Hold one clip in your non-dominant hand, and squeeze open as shown.
 3. Apply a THIN bead of glue on the metal of the bottom portion of the clip.
**NOTE: if you apply too much glue it will affect the opening and closing function of the clip. Thin beads of glue are the key.**


4. Quickly lay your pre-cut 7” piece of ¼” wide ribbon on the hot glue. Be careful not to burn your fingers----the hot glue WILL BE HOT. Once you have the cut end of the ribbon flush with the inside of the clip, run your finger over the ribbon to ensure that it bonds properly.
 5. Now you can release your grip on the spring of the clip and allow it to shut.
 6. Now, turn the clip over so you are looking at the bottom of the piece of the clip you just covered in ribbon.
 7. Apply a THIN layer of hot glue to the metal portion of the clip. (TIP: If you get a big glob in one spot, use the tip of the hot glue gun to help spread it thinner.)
**NOTE: Note the way the clip is being held by the lower portion of the spring. This helps tremendously in avoiding burns from the hot glue and the hot glue gun.**
 8. Quickly fold the ribbon over the edge of the clip and smooth it over the glue. Then, turn the clip over as shown below.
 9. Squeeze your clip open again and apply a clothespin to the lower portion of the clip. Once the clothespin is in place you can release your hold on the spring of the clip.
**NOTE: The clothespin is important, as it serves a dual purpose.**
1. I do not recommend trying this without a clothespin unless you want blister burns on your fingertips.
2. It also ensures that when you apply the glue in the next step that you aren’t gluing your entire clip shut because the glue tends to drip through to the bottom ribbon without the clothespin.
 10. Holding the whole piece by the clothespin, apply a THIN bead of glue on the entire top portion of the metal clip.
 11. Working quickly, bring the ribbon up around the spring-loaded part of the clip and across the top as shown.
 12. Next, remove the clothespin, turn the clip over, open it back up and apply a THIN bead of glue on the exposed metal clip.
 13. Cover the glue with the remaining ribbon. Cut excess ribbon if necessary to allow proper closure of the clip.
 14. Now that you have your clip covered and set aside, it’s time to prepare the embellishment. Gather your supplies: felt flowers, felt leaf and a brad.
TIP: Try different variations using chipboard flowers, large buttons, silk flowers, etc. The possibilities are endless!
 15. Start by inserting the brad through the smallest flower.
TIP: If your flowers don’t have pre-placed holes, use a paper piercing tool to poke a hole prior to inserting your brads. They will go through easier that way.
 16. Continue building your flower embellishment by adding the larger flower, then the leaf. Secure the pieces together by opening the prongs of the brad.

 17. Now, gather your ribbon-covered clip again and hold it so you are looking at the top (the bottom will be flat all the way across). Apply a small blob of glue to the ribbon right where the straight portion of the clip meets the spring tip.
 18. Apply your flower embellishment to the glue and allow to set.
NOW FOR THE HEADBAND!

 1. Gather your supplies. Same supplies as barrette tutorial, plus a headband. :)
2. Follow steps 2 through 13 from the barrette tutorial above to cover an alligator clip with ribbon.
 3. Start building your flower embellishment using an over-sized felt pieces.
 4. If your felt flower does not have a pre-placed hole in the center, use your paper-piercing tool to poke a hole.
 5. Use an over-sized brad to hold your pieces together. Then apply this flower to your ribbon-covered barrette using the example from steps 17 and 18 shown in the first tutorial.
 6. Now, you simply clip the barrette onto your headband. PERFECTLY interchangeable!
ENJOY!!! please leave any questions in the comments. :)
- Metal Alligator Clips
- Headband
- Fine-tipped scissors
- ¼” wide ribbon –7” long per clip
- Felt Flowers
- Oversized Brads
- Clothespin
- Paper Piercing tool (or thumbtack)
- High-melt hot glue gun (preferred) OR Fabric Glue
 1. First, gather your supplies and plug in hot glue gun to allow time to heat up
 2. Hold one clip in your non-dominant hand, and squeeze open as shown.
 3. Apply a THIN bead of glue on the metal of the bottom portion of the clip.
**NOTE: if you apply too much glue it will affect the opening and closing function of the clip. Thin beads of glue are the key.**


4. Quickly lay your pre-cut 7” piece of ¼” wide ribbon on the hot glue. Be careful not to burn your fingers----the hot glue WILL BE HOT. Once you have the cut end of the ribbon flush with the inside of the clip, run your finger over the ribbon to ensure that it bonds properly.
 5. Now you can release your grip on the spring of the clip and allow it to shut.
 6. Now, turn the clip over so you are looking at the bottom of the piece of the clip you just covered in ribbon.
 7. Apply a THIN layer of hot glue to the metal portion of the clip. (TIP: If you get a big glob in one spot, use the tip of the hot glue gun to help spread it thinner.)
**NOTE: Note the way the clip is being held by the lower portion of the spring. This helps tremendously in avoiding burns from the hot glue and the hot glue gun.**
 8. Quickly fold the ribbon over the edge of the clip and smooth it over the glue. Then, turn the clip over as shown below.
 9. Squeeze your clip open again and apply a clothespin to the lower portion of the clip. Once the clothespin is in place you can release your hold on the spring of the clip.
**NOTE: The clothespin is important, as it serves a dual purpose.**
1. I do not recommend trying this without a clothespin unless you want blister burns on your fingertips.
2. It also ensures that when you apply the glue in the next step that you aren’t gluing your entire clip shut because the glue tends to drip through to the bottom ribbon without the clothespin.
 10. Holding the whole piece by the clothespin, apply a THIN bead of glue on the entire top portion of the metal clip.
 11. Working quickly, bring the ribbon up around the spring-loaded part of the clip and across the top as shown.
 12. Next, remove the clothespin, turn the clip over, open it back up and apply a THIN bead of glue on the exposed metal clip.
 13. Cover the glue with the remaining ribbon. Cut excess ribbon if necessary to allow proper closure of the clip.
 14. Now that you have your clip covered and set aside, it’s time to prepare the embellishment. Gather your supplies: felt flowers, felt leaf and a brad.
TIP: Try different variations using chipboard flowers, large buttons, silk flowers, etc. The possibilities are endless!
 15. Start by inserting the brad through the smallest flower.
TIP: If your flowers don’t have pre-placed holes, use a paper piercing tool to poke a hole prior to inserting your brads. They will go through easier that way.
 16. Continue building your flower embellishment by adding the larger flower, then the leaf. Secure the pieces together by opening the prongs of the brad.
 17. Now, gather your ribbon-covered clip again and hold it so you are looking at the top (the bottom will be flat all the way across). Apply a small blob of glue to the ribbon right where the straight portion of the clip meets the spring tip.
 18. Apply your flower embellishment to the glue and allow to set.
NOW FOR THE HEADBAND!

 1. Gather your supplies. Same supplies as barrette tutorial, plus a headband. :)
2. Follow steps 2 through 13 from the barrette tutorial above to cover an alligator clip with ribbon.
 3. Start building your flower embellishment using an over-sized felt pieces.
 4. If your felt flower does not have a pre-placed hole in the center, use your paper-piercing tool to poke a hole.
 5. Use an over-sized brad to hold your pieces together. Then apply this flower to your ribbon-covered barrette using the example from steps 17 and 18 shown in the first tutorial.
 6. Now, you simply clip the barrette onto your headband. PERFECTLY interchangeable!
ENJOY!!! please leave any questions in the comments. :)

those turned out super cute! I have to get to making some of these things for my little gal.
ReplyDeleteThese are adorable! I wish I had somebody to make these for.
ReplyDeleteSo adorable! Gotta give these a try! TFS
ReplyDeleteWow, that looks so easy! Thanks for sharing. I can't wait to make some for my girls.
ReplyDeleteThank you for this awesome tutorial! I will be making some of these for my niece - or that will definitely be the plan.
ReplyDelete